
In this post, we are going to look at Credential Guard by itself, then look at the full Device Guard suite.
Credential Guard focuses on protecting user and system secrets, such as hashed credentials. Credential Guard is easy to implement without a lot of impact. Device Guard goes beyond Credential Guard by providing code integrity policies, which prevents unauthorized code from running on your devices—think malware. Deploying Device Guard broadly is a much more significant undertaking than Credential Guard. It’s fine to implement Credential Guard now and Device Guard later if that works best for your company.
In Windows 10, Device Guard and its components are available in the Enterprise and Education SKUs. In Windows Server 2016, it is available on all SKUs. However, some features are not available if you use the Nano Server installation option.
Hardware
To fully deploy Device Guard, you need to have a certain standard of hardware. Any business-class hardware bought in the last three years should suffice. Because Device Guard relies on a hypervisor (in this case, Hyper-V), you need hardware that is capable of being virtualized. Requirements are a 64-bit CPU, CPU virtualization extensions, UEFI firmware version 2.3.1.c or higher, and Secure Boot enabled. A full list of requirements is available here: technet.microsoft.com.
With compatible hardware, the code integrity service runs alongside the Windows kernel in a hypervisor-protected container, making it nearly impossible for a bad actor to execute malicious code, even if they have control of the Windows kernel. For Credential Guard in particular, the authorization mechanisms also reside in this container, which offers mitigations to attacks such as pass-the-hash.
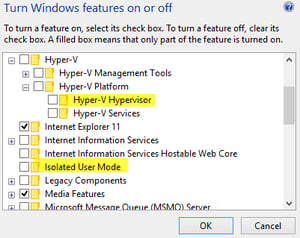
If you are on Windows 10 v1607 or higher, Server 2016 , Hyper-V will automatically be enabled when you turn on Device Guard. If you’re not on at least Windows 10 v1607, you will need enable the Hyper-V and Isolated User Mode Windows Features.
Device Guard can also be deployed in Hyper-V virtual machines, if the physical host is running Server 2016 or Windows 10 v1607, and the VM is a generation 2 VM.
Activating Device Guard and Credential Guard
Turning on Device Guard is one Group Policy setting. Do NOT configure this setting in your Default Domain Policy, as you do not want code integrity or Credential Guard applied to your domain controllers (more on that in Credential Guard section).
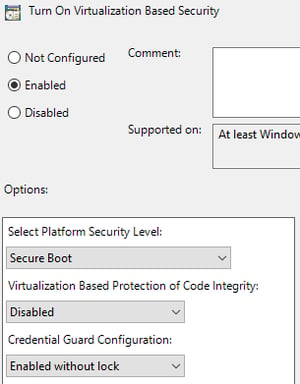
In your GPO, navigate to Computer Configuration > Administrative Templates > System > Device Guard. Edit the policy “Turn On Virtualization Based Security”. To turn on just Credential Guard, I recommend these settings:
To turn on full Device Guard, you’ll need these settings:
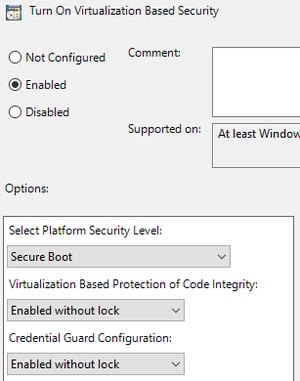
You can read about the various settings in the Help box (in the screen above, cropped out of shot). To summarize, the first box has two options – Secure Boot and Secure Boot with DMA. Keeping this at Secure Boot ensures that this policy will apply to all machines. If you set the policy to Secure Boot with DMA, this policy will only apply to computers that can handle DMA, so you’ll likely miss some of your machines. If you leave it set to Secure Boot, machines that support DMA will use Secure Boot with DMA.
If you want Device Guard, set the next two boxes to Enabled without lock. Its recommended that you run this without lock, at least for a little while. If you enable the lock, you cannot modify this policy remotely, so you must disable it via GPO. Once your environment has stabilized with Device Guard, you can modify this to lock.
If you only want Credential Guard, set the “Credential Guard Configuration” box to “Enabled without Lock”. Keep “Virtualization Based Protection of Code Integrity” set to disabled.
After a restart, you can check that Device Guard or Credential Guard is enabled by running msinfo32.exe and looking at the bottom of the System Summary page. You should see these six entries:

This screenshot shows Credential Guard only, but you get the idea of where to look to ensure that your policies are on.
If all you want is Credential Guard, stop here. The remainder of this post will be configuring and deploying a code integrity policy.
Create Device Guard Policy
Creating a Device Guard policy is simple. You start with a gold master computer. This master should have the software that can run installed on it, and only that software. From this computer, run the listed PowerShell commands. The path in lines three and four must exist prior to executing those commands. The commands will not create the path, and the commands will error if you do not create it first.
$dg_policy = “c:\dg\dg_policy.xml”
$dg_policyBIN = “c:\dg\dg_policy.bin”
new-cipolicy -level pcacertificate -filepath $dg_policy -userpes
convertfrom-cipolicy $dg_policy $dg_policyBIN
Note that the new-cipolicy step takes quite a while to run. After it completes, you should have your BIN file at C:\dg.
Code Integrity Policy GPO Setting
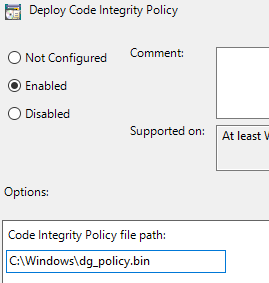
To define the Code Integrity policy, open the setting “Deploy Code Integrity Policy”, located in the same place as the virtualization-based security setting. The file you reference can be in a .bin format (unsigned file) or a .p7 format (signed file). Open this setting, and type in the path and file name. The file can exist on the local computer, or on a network share.
Remember that a device can only have one policy applied to it. I recommend keeping your gold master in a VM that you power on and regenerate this policy as needed. It is possible to merge policies, but that is out of the scope of this post. Additional documentation is available here: technet.microsoft.com.